"Fast seamless conveyor belt joint sleeve" is a new method invented by Hangzhou Heli Rubber Products Co., Ltd. to connect the conveyor belt with a joint sleeve. This is a major reform of the conveyor belt joint. Compared with the traditional connection method, this joint method The advantages are more distinct, which are mainly reflected in the four characteristics of "fast joint speed, stable operation performance, strong interface tension, and labor and cost saving". This product is an invention patented product, the patent number is ZL200610053597.1.
The patent of the invention relates to a connection structure of a rubber conveyor belt joint. The joint sleeve has open left and right groove sleeves located on both sides of the joint body and has an integral connection structure with the joint body; the joint body of the conveyor belt joint has a tenon structure and is connected with the joint body. The open left and right groove sets match.
1. An overview of the method and steps of the joint sleeve:
The two ends of the joint sleeve are concave, and the concave is divided into upper and lower pieces. The upper and lower rubber layers are thick and the lower rubber layer is thin; the concave upper and lower two ends have a 20mm slope surface (see Figure 1).
1.1 According to the length of the concave upper and lower pieces of the joint sleeve, peel off the rubber at both ends of the tape to be jointed to form an inclined tenon.
1.2 Apply adhesive to the groove of the joint sleeve and the tenon of the tape, align and bond the slope surface of the joint sleeve with the corresponding inclined surface of the tenon, so that the joint sleeve rubber is covered on the tenon of the tape.
1.3 After bonding, use specific bolts for secondary reinforcement according to the holes on the joint sleeve to complete the joint.
Note: The total length increases after the joint. After the joint is sleeved on both ends of the tape, the length can be increased by about 150mm.
Figure 1: The concave shape of the connector sleeve
2. How to make the tenons at both ends of the conveyor belt joint:
2.1 Cutting. Cut the tape at right angles according to the required length. When cutting the tape horizontally, it must be cut at right angles, otherwise the tape will run off.
2.2 Peeling. Corresponding to the upper sheet of thick rubber stripping 100mm, the lower sheet of thin rubber stripping 85mm, be careful not to damage the fabric (canvas layer) during the peeling and cutting operation. It is best to control the thickness of the protruding fabric to 6mm and not more than 7mm.
2.3 Microdermabrasion. Peel 20mm above the 100mm thick rubber surface of the upper sheet, and grind a slope surface with a sander to form an upper tenon surface with a total length of 120mm; similarly, peel 20mm above the 85mm thick rubber surface of the lower sheet, and grind one The slope surface forms a lower tenon surface with a total length of 105mm (see Figure 2).
Note: For novices who have no experience in peeling, if peeling is difficult, you can use a manual shaver or sander to grind all the rubber off according to step 2.2.
Figure 2: Diagram of the tenon on both ends of the conveyor belt

3. How to operate and use adhesives:
At present, there are many cold adhesives on the market, and most of them use neoprene modified adhesives, such as conveyor belt cold joint adhesives, etc. The use methods are basically the same. This product uses 2 combinations, namely adhesive and curing agent, generally used in conjunction with 10% Lekner curing agent.
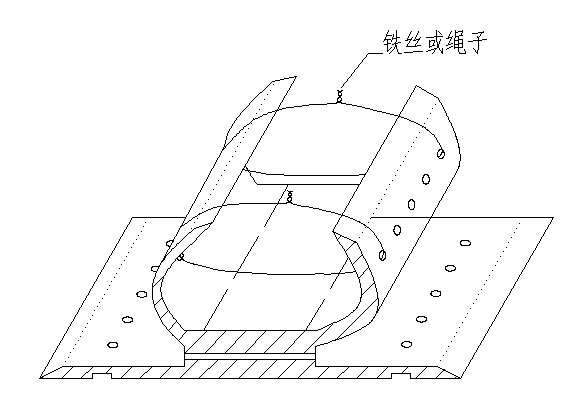
3.1 Clip. First, clamp the two ends of the cover sheet (thick leather) facing each other to make it easier to clean dirt and apply adhesive. If there is no clamp, you can tie up the screw hole of the sleeve with a pair of iron wires or rope, as shown in Figure 3.
3.2 Dust removal. Before applying adhesive, remove the dust on the inner surface of the joint sleeve. Because it is difficult to roughen the concave shape of the joint sleeve, this product has been pre-processed by the internal grinding. However, if the inside of the sleeve is stained with dust during installation, it must be polished again to remove the dust.
3.3 Repeated painting. When applying the adhesive, the brush must be brushed repeatedly, in order to make the viscose evenly penetrate the canvas string, otherwise the adhesive staying on the surface will seriously affect the bonding strength.
3.4 Secondary painting. The adhesive usually needs to be applied twice. After the first application, wait until the surface is completely dry, and then apply the second time, you can first coat the concave sleeve, and then coat the tenon. Apply adhesive on both sides of the tenon. When coating the tenon, the coating area of the bevel rubber is slightly larger than the polishing area.
Figure 3: Schematic diagram of clamping the connector sleeve
4. How to connect the joint sleeve and the tape
4.1 Coupling time: After the adhesive is basically dry, it can be coupled. If the adhesive is too dry, you can lightly brush some very dry adhesive, and then it can be coupled. (The best time is to touch the adhesive with your fingers and not stick your hands.) Note: The adhesive is made of very fresh adhesives and can usually be prepared with Lekner curing agent.
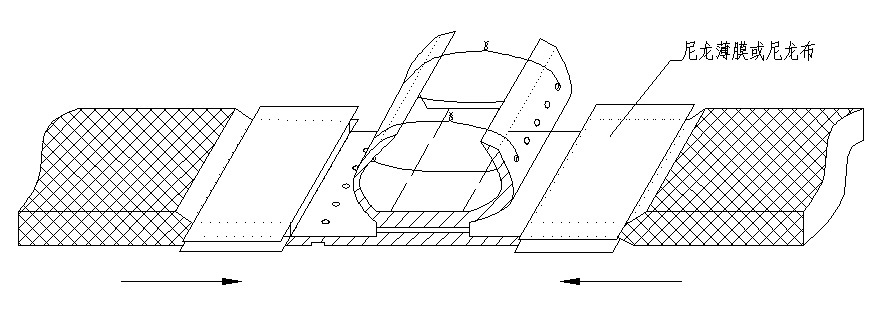
4.2 Bonding the bottom piece. Before fitting the grooves, the tenon ends can be wrapped with a clean nylon film to prevent the convex ends from sticking to each other when they contact the concave piece. After confirming that the bottom sheet (lower sheet) of the joint sleeve is completely perpendicular to the convex end of the tape, the nylon film can be removed and the lower sheet of the convex end can be glued. (See Figure 4)
4.3 Bonding of the top sheet. After the two ends of the lower sheet are glued, the two ends of the upper sheet are glued. Make sure that the joint sleeve is perpendicular to the tape before releasing the top piece of rubber (the thick rubber that is clamped or tied up).
4.4 Repaint and glue. The released topping glue will be uneven when the adhesive is applied when it is clamped to be covered. The glue to be repaired is basically dry, and the glue is applied when the best adhesion is achieved.
4.5 Bonding and pressing. Gluing and pressing should go down from the middle, and then expand to the left and right, and not squeeze from the sides. First compress it by hand, then use a wooden hammer to move down from the middle, and then tap it to the left and right. If you don't have a wooden hammer, you can replace it with a hammer, but don't use too much force when hitting, so as not to damage the canvas.
Figure 4: Schematic diagram of bonding upper and lower sheets
5. Bolt reinforcement and sealing
5.1 Punch screw holes. Put the tenons on both ends of the conveying tape into the concave piece of the joint sleeve, and punch holes with a flashlight. Drill holes of the same size vertically according to the predetermined hole positions of the joint sleeve. The drill bit for drilling is best to choose the drill bit for woodworking holes, the hole diameter is ¢12mm. Use a woodworking drill to take out the residue in the hole and keep the edge of the hole smooth, which is conducive to the smooth threading of the screw in the tape.
5.2 Fix bolts. According to all the holes on the joint sleeve, inlay the female thread base from the lower piece of thin rubber position upwards, then put the gasket on the upper piece of thick rubber hole, and then tighten it with a countersunk hexagon socket screw to complete the joint, as shown in the figure 5 shown.
5.3 Tighten the screws. Tighten the screws repeatedly in three times. Since the rubber is an elastic body, it needs to be tightened gradually. The general torsion force is 150N (N), but when it is used immediately, since the adhesive has not been cured yet, the pulling force mainly comes from the screw reinforcement, and the tightening degree should generally be increased to 200N (N).
5.4 Sealing. In order to prevent the edge warping of the joint sleeve during operation, a layer of adhesive can be brushed on the edge of the joint and a row of "barbed sealing nails" can be knocked on (Figure 6).
Figure 5: Schematic diagram of bolt reinforcement
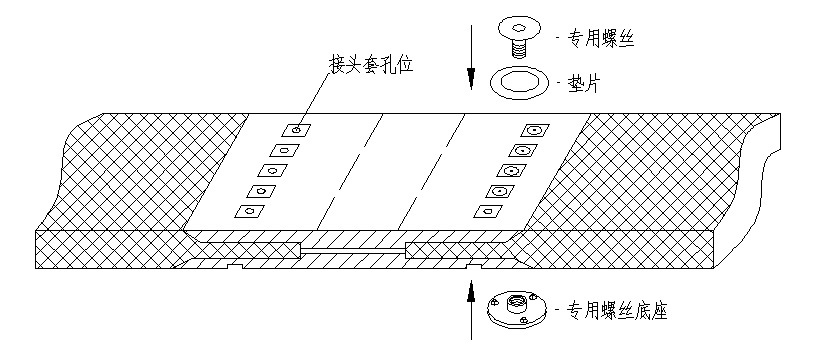
Figure 6: Schematic diagram of knocking on the sealing nail
6. Matters needing attention:
6.1 If the joint is used immediately after completion, it should be prevented from coming off before the adhesive is cured.
Generally, it takes 10-24 hours to cure the adhesive, and the curing time is longer when the temperature is low or below zero. Therefore, if you need to use it immediately after the joint, you must knock a circle of shoe nails 10mm from the edge to prevent the use of adhesive joints. Degumming. The density of nails is usually about 15mm. In the process of knocking the nails, it is divided into upper and lower ends. The density of the nails on the upward movement can be increased or multiple rows; the lower part of the relative movement can reduce the nails, because the lower part is homeopathic and will not be pried by the material.
6.2 Mastery of adhesive drying during the bonding process:
(1) The adhesive is evenly solvent-dried in the first brush, the purpose is to make the adhesive fully penetrate into the fabric, so that the solvent can dry and fix the two objects together (2) The second brush must be the adhesive in the first time. Only when the mixture is dried can it be effective and strong. (3) Mastering the best time for bonding can achieve a viscosity greater than 60N per square meter, so it can be used without knocking nails.
6.3 The width of the joint sleeve must be slightly smaller than the width of the tape to prevent the tape from damaging the joint and affecting its service life
The deviation of the conveyor belt during the operation process often occurs. If the width of the joint is larger than the belt, the belt will be easily damaged when the belt is deflected. Therefore, the width of the joint must be narrower than the width of the belt.
The width of this joint sleeve can be cut. The cutting can be done before applying the adhesive, or after all the bonding is completed, draw a line on the two edges of the tape, and cut it off at a place about 10mm narrower than the tape.
6.4 Simple joint method: first tighten the screws, and then brush the adhesive.First put the tenons at both ends of the tape into the concave piece of the joint sleeve, after the electric drill is drilled to tighten the inner screw, and then the adhesive is applied to the connecting part outside the screw. When the adhesive is basically dry, it can be used. If detachment occurs, the dust can be removed and re-bonded.
6.5 Screws may need to be processed:Due to the difference in the thickness of the tape, the length of the screw can be exchanged; if the screw is too long beyond the end of the nut, the tape must be turned to the position where the end of the nut is up, and the screw is flattened with a sander.
7. Other problems that may occur during use:
7.1 There is uneven gluing during the bonding process, sharp soil is adhered after gluing, etc., which causes the adhesive strength of the tape and the joint sleeve to decrease, and the rubber peels off during use. This phenomenon requires timely treatment.
7.2 If there is a phenomenon of degumming, stop for emergency repair, remove the dust from the disengaged position again, brush the adhesive and wait until it is basically dry (press the finger on the coated adhesive and the finger will not be glued with the adhesive) before bonding. (If the temperature is low, the adhesive is not easy to dry, you can use a hair dryer to dry.)
7.3 The density of shoe nails can be higher if they are used immediately.
7.4 Check the internal thread, whether the screw is loose, if it is loose, tighten it according to 5.3.
8. Advantages of using this product connector sleeve:
8.1 The most traditional joints use belt buckles. Compared with the joint sleeves of this product, belt buckles leak fine dust and pollute the environment. Second, the tape is easy to tear longitudinally when using a belt buckle, which seriously reduces the service life of the tape. Third, the belt buckle has a short service life and usually needs to be replaced.
8.2 The conveyor belt adopts hot glue joints and cold glue joints. Compared with joint sleeves, hot glue or cold glue joints have higher technical requirements and slow bonding speed. It is difficult to master the technology without technical training. However, the operation of this product joint sleeve is simple and fast , The bonding strength is large, the bonding performance is stable, and the general enterprise mechanics can quickly grasp the joint.
8.3 Save labor and cost. When the joint sleeve is used as a tape joint, the joint length can be extended by 150mm without losing the joint length. Due to the good connection effect and the fast joint speed, the utilization rate of the waste belt can be greatly increased. For example, the waste tape after repair is selected and cut with useful short heads, and the tape can be used again after the joint sleeve is used for quick connection, which greatly saves the cost of the enterprise.
Conveyor belt joint cover www.hl-xj.com
(Inventor of this patent: Wang Naizhao Contact email: 875942417@qq.com) Original pictures, please indicate the source for reprinting.